Making Game Pieces for Classroom Activities
A decade ago, there was a lot more collaboration in the blogging world. Or maybe there still is, but I'm just missing out somehow - I definitely blog alone these days. I miss those days, as what I wanted to share out with the teaching world today would have fit right in with the "Bright Ideas" blog posts we used to do. But life moves on!
This past fall, I developed a resource for my junior grade classroom, as a culminating task to wrap up a unit. Not super original - bet many of you have done the same thing at some point as well. I know I've certainly done this before too. I wanted my fifth graders to make a board game to review the main content and show their learning at the end of our Science unit.
Although it's a common strategy, I didn't find exactly what I wanted to do with my class, so I made something for them. you can grab a copy here in my TPT store if you like. (I'll be posting a French version for the immersion classroom soon as well, and possibly also an editable version, should you prefer that. Check back soon for those links!)
What I found particularly interesting was how challenging finding or making game pieces was for them. Maybe that was just a quirk of this particular group, but as young people, I really expected them to come up with more creative solutions than I had to offer them. They didn't.
The most creative group used plasticene (which was an option I had presenting in my suggestions!) but unfortunately it was not modelling clay and didn't harden up at all. Bet you can guess what happened - some one in the class squished their carefully crafted little animal game pieces before we got a chance to play. So sad! Most opted to make game tokens out of the cardboard scraps I'd provided for the class. Some just cut up paper at the last minute, after we'd been working on these board games for two weeks.
So now I know for the next time I use this resource (likely next year, as it can easily be adapted to different grade levels and topics) that I need to model this a little more concretely for them. Here's what I'll show them the next time around.
Buttons
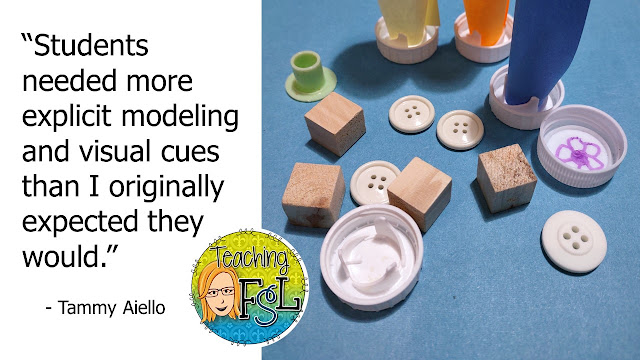
I've gathered an assortment of old buttons - to be used as is, or by adding a little number or symbol right on them.
Pennies
Not everyone might have some of these around, but I do. So I may as well show the students that you could put a drop of liquid tempera paint on the top and those will work - at least for a while - as game tokens.
Drink Caps
I've also gathered a few different types of reusable materials from home to show them what they might find around them as well. Juice carton lids are my favourite. Other small drink lids are in the collection as well (including from ramune, which has been my daughter's favourite lately!) The challenge is to keep the game token the same size or smaller than their game board squares or circles, so that navigation will be easy when playing the game.
Dice/Cubes
I've also included in my ziplock baggie for next year some blank wooden cubes from a dollar store. They can colour them differently with paint or markers, or even just colour the top or draw a little symbol or number them.
Binder Clips
I've also included some binder clips that can be put in the closed position and stood on end, containing a little drawn image or not, depending on whether the students have all the same binder clips or different ones.
What have I missed? I honestly didn't even give this a lot of thought. Those were the items that came to me rather quickly. If you have additional suggestions, be sure to drop them below in the comments!


